

10 Tips for (journalists) Designing Infographics
This article was originally published on “Digital Newsgathering”, a class blog for Journalism 226 at San Francisco State University, Instructor: Staci Baird. I wrote this post as a guest author, and with permission I am republishing it here.
Assuming you’re not working for a media corporation with huge graphics and statistics departments at your disposal, you may want to create some infographics for your own articles. With today’s flood of information, infographics allow readers to quickly digest and understand complex data. A good infographic will not only inform readers, but will also create interest and convince people to read your article similar to how good headlines and photos attract readers. In contrast, both boring and overly complex graphics will quickly convince readers to ignore your article.
Here are 10 tips for designing better infographics (click the images to go to their original sites):
1) Be Concise: Design your infographic to convey one idea really well. You’re not writing a scientific research paper, so don’t expect your reader to dig into a lot of detail. This doesn’t mean you should only visualize one number, but your entire graphic should support one of the major points from the article. You can include additional facts or information to make the infographic stand on its own, but don’t lose sight of the point you want to get across.
This example is an infographic poster I created about the caffeine content in drinks. At this size, you can easily tell which drinks have more or less caffeine, and if you decide to view the higher-resolution image you can dig deeper into the details and additional information that’s included in the poster.

The Caffeine Poster, by Randy Krum
2) Be Visual: Design your infographic with your final for viewing size in mind. A number of articles online require the viewers to click on a text link to view the graphics that accompany an article, and I believe this is a huge mistake. Design your graphics to be viewed in-line with your article. There’s nothing wrong with allowing viewers to click the image to see a high-resolution version, but they should be able to understand the image when viewed with the article. A side benefit is that a viewable image also allows for readers to share the image by itself on social media sites easily.
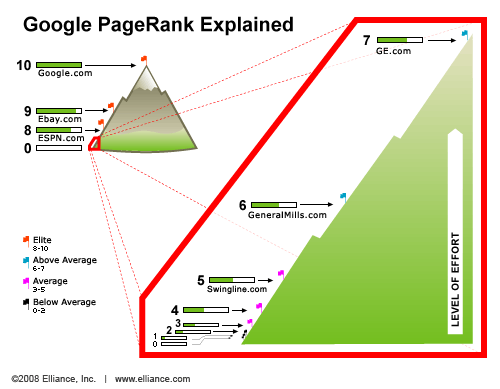
Google PageRank Explained, by Elliance
3) Be Smarter: Build your data and explanation right into the infographic, and don’t make your readers have to work hard to understand what they’re seeing. Your infographic shouldn’t need a legend to be understandable, and there’s no reason to ask your readers to keep moving their eyes back and forth between the chart and the legend to understand the graphic. Treat your readers as intelligent and make your graphic look professional by including the relevant descriptions and numbers in the infographic.

Who Participates Online?, by Arno Ghelfi for Wired Magazine
4) Be Transparent: Infographics can be used to lead readers to the wrong conclusions. Always cite your data sources and allow readers to dig deeper into the data if they have the desire. Some of the best articles include easy access to the source data with links to a spreadsheet for readers to view on their own.

BBC Budget, by David McCandless
See the visual. Explore the data.
5) Be Different: If you can avoid it, don’t use a bar chart, a line chart or a pie chart. This infographic of visualization styles is a great resource to help determine a good visual to use for your data. The different styles are grouped together by the type do data they are trying to communicate and in the interactive version, an example is shown as you mouse over each style.
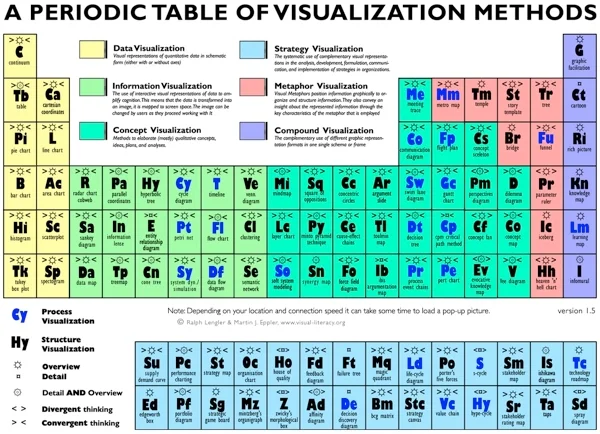
Periodic Table of Visualization, by Visual-Literacy.org
6) Be Accurate: Remember your geometry and visualize differences using area. When trying to convey the scale of your data, many graphics use different sized shapes or images to show amounts relative to each other. The reader’s eye sees the total area of the image as indicative of scale, not just the height of the image.
For example, if you’re using circles to show one number is 3 times larger than another, the area of the circle must be in proportion to the values being represented. If you make the mistake of making the diameter of the circle 3 times larger, the area is actually 9 times larger.

Circle Areas, by Randy Krum
The infographic below breaks down the number of FedEx trucks using the area of the circles in a mind map style image. This could have been a simple bar chart, but it’s much more visually appealing as a bubble mind map.

The Fedex Universe, by Robin Richards for MeetTheBoss.tv
NOTE: One common exception to this is a standard bar chart. No matter how wide the bars are, the height is the only dimension that conveys meaning.
7) Be Attractive: Include visuals: Illustrations and photos included in the infographic make a big difference. Even though this example is a bar chart, the inclusion of the company logos make it quicker and easier for the reader to understand.

What Does Your Email Provider Say About You?, by CreditKarma.com
8) Be Varied: Find a good visual style that’s right for the data you’re trying to share. If your data is about countries, plot it on a world map not a bar chart that lists countries. Also, don’t be afraid to mix visualization styles together in one infographic.
This example infographic by Emily Schwartzman about the aftermath of the earthquake in Haiti won a design contest from GOOD Magazine, and mixes map data with a stacked bar and colored boxes for percentages. This is also a great example of viewing size. You can see and understand the visuals, but the actual numbers are available if you view the high-resolution version.
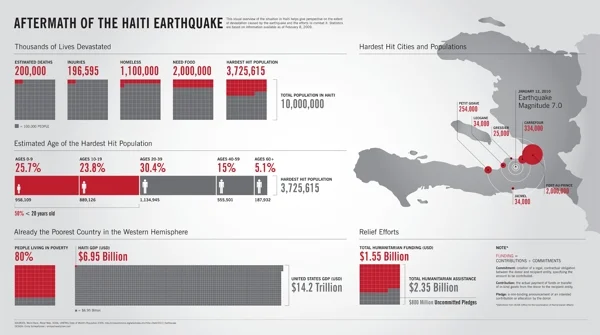
Haiti Earthquake Infographic, by Emily Schwartzman
9) Be Gracious: Work on the assumption that your infographic may be viewed or shared without the article you originally designed it for. Make sure that the final graphic includes the following pieces:
Copyright, to be explicit about any rights and terms of use
Source data, so anyone can check your facts
Designer’s name, always give credit to the artist/illustrator/programmer/designer
Original image/article address, so anyone who sees the image can find your original article
10) Be Creative: Use whatever tools you have available to create your infographic. Of course, the tools you use will depend on what you are trying to visualize. Many infographics can be created using simple applications like a vector drawing program (like OmniGraffle or Microsoft Visio), a charting program (like Microsoft Office or Apple iWork) or an image editing program (like Adobe Photoshop).
Here are some visual tools available on the Internet: